MPE in Live 11
Everything you need to know about MIDI Polyphonic Expression in Live 11
MPE = MIDI Polyphonic Expression
Live 11 brings many new features: take and comp recording, additional device macros, new reverb and spectral processors, interface improvements, and more. The one feature that I'm most excited about is MIDI Polyphonic Expression, or MPE. This gives control over each note in an instrument's MIDI clip, putting parameters at your fingertips instead of behind industrial appliances.
MPE was adopted as a standard in 2018, and is completely compatible with MIDI 1.0. It is a sort of a "subgroup" of MIDI, where it uses a very specific selection of standard MIDI messages such as notes, velocity, pitchbend, channel pressure, and control change messages. It groups notes with these messages on their own channel and makes it easy for software to map each note to different parameters to constantly vary sound on each independent note.
The implication of MPE is that it provides a more natural model for playing instruments. The many actions on acoustic instruments - where you pluck, strike, or bow, the amount of force applied, and what you do as the note sounds - all contribute to the emotional effect of the sound. MPE puts all those dimensions into electronic instruments, opening up some new sonic territory. The final effect can be dramatic or subtle, depending on how you implement it.
In this tutorial I'm going to show off the current state of MPE in Live 11, and show you how to harness this power with your controller, your instruments, and edits to nail down your production. I’ll cover the various instruments that use MPE, as well as how to convert, tame, and edit this new data stream.
Even though MPE is only a couple years old, this standard has been implemented in many different ways by software developers. I've covered this diversity in many other videos you can find on our YouTube channel. I find this variety persists, even among the instruments in Live.
Follow along with details and videos about how to use MPE in Ableton Live. I've tried to provide simple, yet comprehensive instruction and, I hope, inspiration.
Overview
Per-Finger, Per-Note
MPE lets us play with a lot of sonic variety per-finger, or per-note, which you can't do with a regular keybaord. So if I play this instrumet with a regular keyboard, I can do things like this:
If I use an MPE controller, I can use position and pressure to change each note's timbre in realtime.
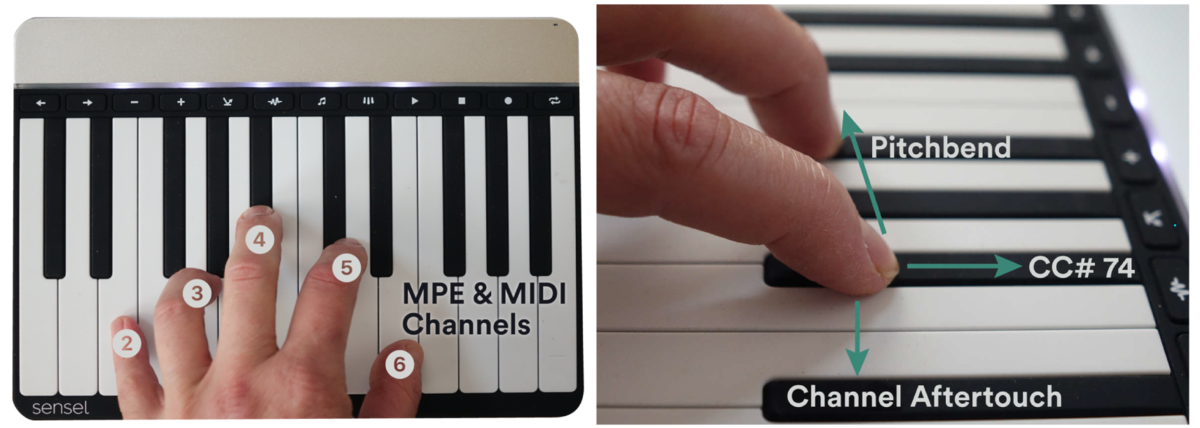
MPE works by sending each note on its own MIDI channel, with a maximum of 15 notes. So if you play a five note-chord, you are using five MIDI channels. In general, though not always, channel 1 is used for global controls, and channels 2-15 are used for notes.
If you are working in Max for Live, It is worth noting that Ableton Live doesn’t directly apply the channel number to voice number internally, so when a controller like the Morph sends notes on channel 2 and 3, for example, that won’t automatically be considered voices 1 and 2 in the Max for Live MPE voice handlers, as it rotates through its own count.
When using MPE in instruments, you generally need to find the modulation matrix. You can see this in Sampler and Wavetable's MIDI tabs. In the current beta I'm working with, MPE is not possible for Operator, Impulse, Drum Synth, and the AAS modeling instruments like Analog and Tension. Even though those instruments can't use per-note changes, you can still do some really cool stuff, which I'll explain later in this article.
When using MPE in instruments, you generally need to find the modulation matrix. You can see this in Sampler and Wavetable's MIDI tabs. In the current beta I'm working with, MPE is not possible for Operator, Impulse, Drum Synth, and the AAS modeling instruments like Analog and Tension. Even though those instruments can't use per-note changes, you can still do some really cool stuff, which I'll explain later in this article.

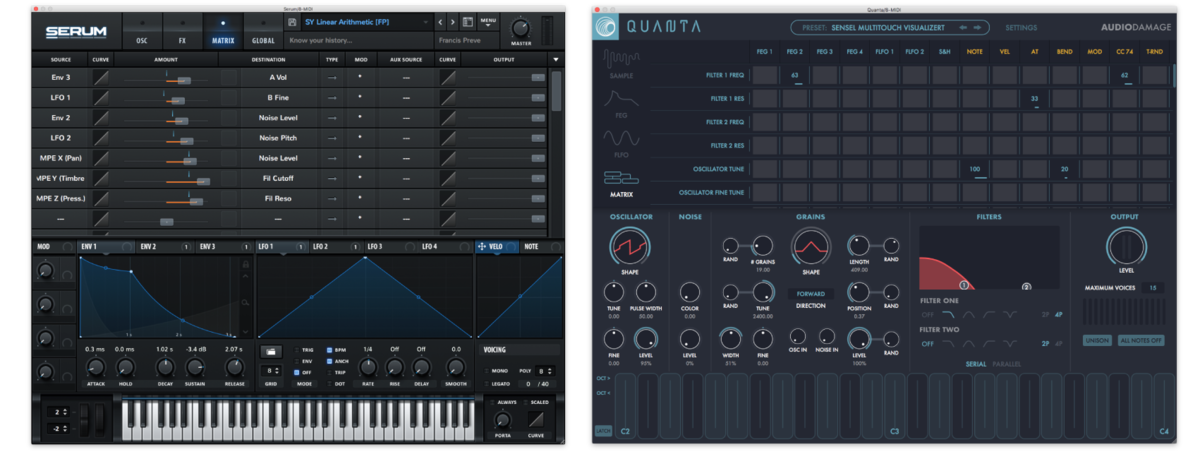
In MPE plugins, like Audio Damage Quanta or Xfer Serum, you'll find a similar matrix.
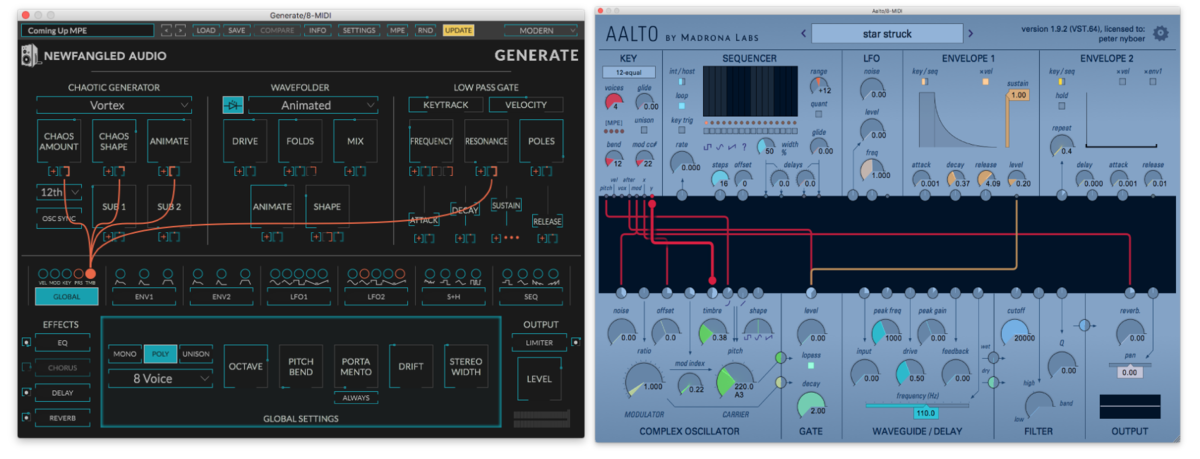
In plugins with patchable interfaces like Newfangled Generate and Madrona Labs Aalto, applying MPE works just like any other modulator, like an LFO or envelope.
In short, you use an MPE dimension, like Slide, or Pressure, and apply it to a parameter, like a filter or volume. You'll see references to "Slide", "Vertical", or "Y", which all refer to the same gesture. Similarly, you'll see "Glide", "Pitch", "Note Bend", "Horizontal" or "X", and "Pressure" "Aftertouch", or "Z"
Download
Probably the easiest way to get started is to sit down and PLAY! Download this free Live pack with a custom Sampler instrument, Wavetable preset, and a factory Sampler preset modified for MPE. We look forward to hearing what you create!
Simpler
Simpler supports MPE, but I've found there's not a lot you can do with many of the presets except per-note pitch. Since there's no modulation matrix in this simple instrument, I can't start adding controls. If you want to do that, convert to Sampler.
Sampler
Now that I am using the Sampler interface, I can start to modify the instrument with the MIDI assignment tab, selecting parameters to control with the MPE modulators listed at the bottom of the MIDI panel.
Completing the cycle, and making the instrument more universally accessible, I can convert it back to Simpler and maintain MPE control.
Wavetable
Wavetable offers the most flexible assignment matrix, letting you quickly apply MPE gesture sources to parameters in Wavetable. This is great for quickly dialing in a sound or, less productively, getting lost in possibilities.
External Instrument
If you have an external instrument that supports MPE, such as an Ashun Sound Machines Hydrasynth, you can pass MPE data to it from Live for playing and editing. In theory, you could even use a multi-timbral instrument, like a DX7, and turn it into an MPE instrument by loading the same patch on each channel.
Unfortunately, the external instrument does not maintain channel information from an MPE controller - it instead cycles through its own internal voice numbers. As a result, you can get inconsistent behavior if you are always expecting your first finger to output on MIDI channel 2, or if you have channel-limited the output of your MPE controller.
Drum Rack
You can use MPE with a Drum Rack - expression data is just passed to the cell in the grid.
Plug-Ins
You can load MPE plugins into a MIDI track and use them in Live. Some of my favorites are from Audio Damage, Newfangled Audio, and Madrona Labs. Some popular MPE plugins include Xfer Serum, Arturia Pigments, and UVI Falcon.

An important thing to notice is that some MPE plugins are not immediately recognized as MPE-compatible, so you won't see the "MPE" label in the title bar. Right click on the title, and choose "Enable MPE".
Editing
When I play a standard keyboard controller, I'm sending a note and velocity.. That's it, and it's easily visualized in the MIDI clip. If I want to modify the sound, I use a bend wheel and mod wheel, and those are recorded on separate clip envelopes that affect every note.
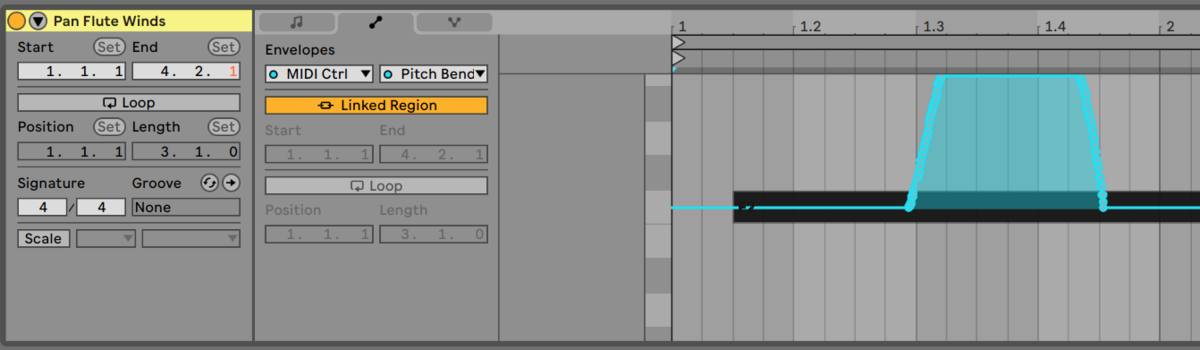
When I play an MPE controller, I'm sending note, velocity, timbre (cc 74), pitch bend, and pressure in one big stream for every note. As a result, when I record into Live, the editor has to be very different to let me view and change this data - I can't just rely on automation lanes for the entire track anymore.
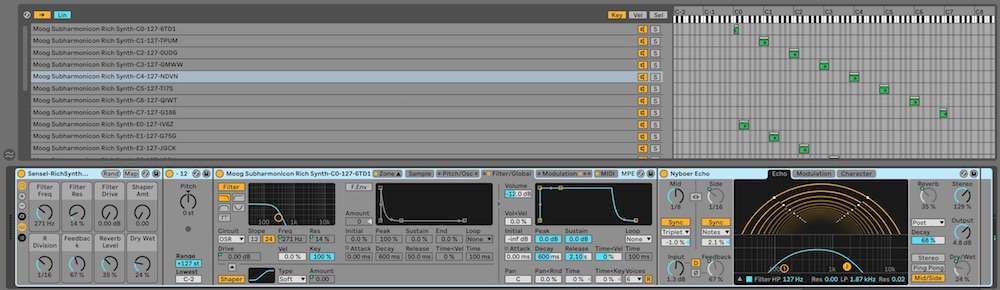
Open the clip view to edit all this per-note data. Live 11 brings a new tab to the view for Expression editing. You'll find this term "Expression" is used in a lot of DAWS that support per-note edits, such as Cubase and Bitwig - that's because it can cover more ground than just the five dimensions of MPE.
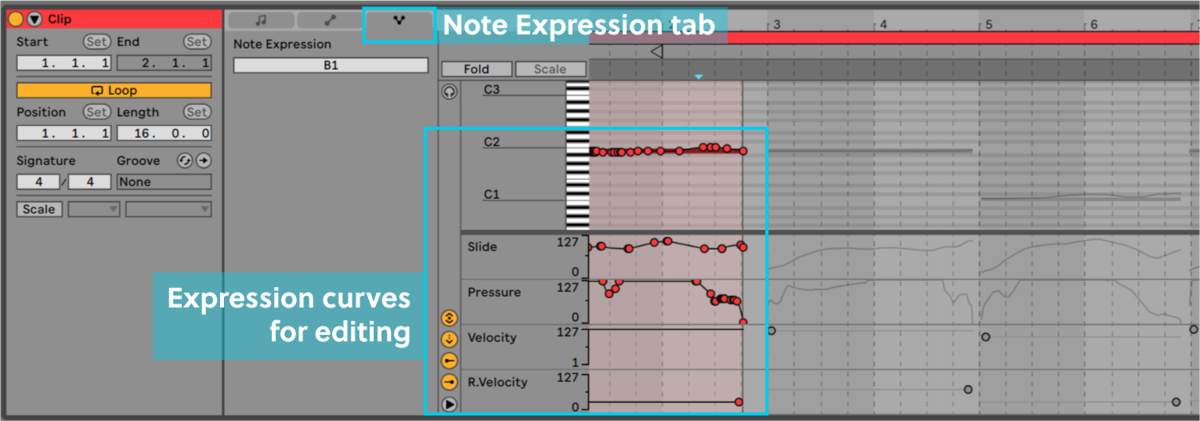
In this view, each note has its own sort of automation lanes for drawing curves, which brings us to an important point: you don't need an MPE controller to harness the power of MPE. These are computers, after all, so using precisely drawn curves can really bring out some different sounds from your instruments.
Taming Your Controller
All this control at your fingertips is great, but, like an acoustic instrument, it can really take some practice to get used to it and get good at dialing in the fine motor skills. However, as computer users, our ideas usually get ahead of our bodies, and, fortunately, there's some tools for this in Live.
In the MIDI Effects is the Max for Live device MPE Control. Here I can apply minimums, maximums, curves, smoothing, and translation to the data coming from your controller or clip. A really good example is using this to tame pressure, where you may not want pressure to do much unless you really lay into it.
This is also great for global fixes to your recorded expressions - rather than laboriously editing the curves from heavy-handed pressure, just bring down the max with this device.
No MPE? Fake it.
So far, we only have native MPE support for the instruments Sampler and Wavetable. This may or may not change. However, that doesn't mean we can't still use these Expressive ideas in something like Operator, Analog, or a favorite plugin.
For Operator, the MPE Control device is ideal, since it allows us to translate MPE's polyphonic messages into monophonic Pitch, Mod Wheel, and Aftertouch messages that are easily applied in Operator's "Algorithm" panel.
When working with an instrument like Analog or a VST, which does not have any built-in MIDI modulators, we can use the Expression Control device, which makes it easy to map MPE gestures to parameters in the device. Mapping is just a click away, and inputs are easily, too.
Just think how insane this could get if you apply some gestures to the effects selector. We did something similar in a sound set we did with Laura Escudé - check out how that sounds.
Effects
While effects won't be polyphonic (per-note), MPE gestures can control them for some extra sizzle to your instrument designs. In this clip, I'm using the MPE Control to create curves to isolate effects control to the very top of the keys, as well as the top of the pressure range. I then use the Expression Control device to map the Slide and Pressure data to the "wet" mix controls of the chorus and delay
DIY?
Though beyond the scope of this tutorial, it is possible to create custom MPE instruments with a combination of Max for Live and Instrument Racks. My initial investigations make it seem possible by modifying the Expression Control device to filter expressions from only one voice. From there, it’s a case of mapping this voice-exclusive expression data to an instrument like Operator or Analog in the same rack level. This would require 15 copies of this rack, for each voice possibility. Creative design and use of macros will be essential, because your edits will have to be made per-voice!